Turning Olive Wood (Why It’s a Challenging Wood To Work With)
Turning with olive wood can be a challenging endeavor for woodworkers.
From its hardness to its unique grain patterns and natural oils, olive wood presents its own set of obstacles. In this article, we will explore the challenges that come with turning olive wood and provide valuable insights into the tools, techniques, and finishing methods best suited for working with this fascinating wood species.
So if you’re ready to take on the challenge and create beautiful olive wood projects, let’s dive right in!
The Challenges of Turning Olive Wood
Olive wood poses a number of unique challenges when it comes to turning. One of the main difficulties lies in its hardness.
Olive wood is known for being a dense and tough wood, which can make it more challenging to shape and carve compared to other softer woods.
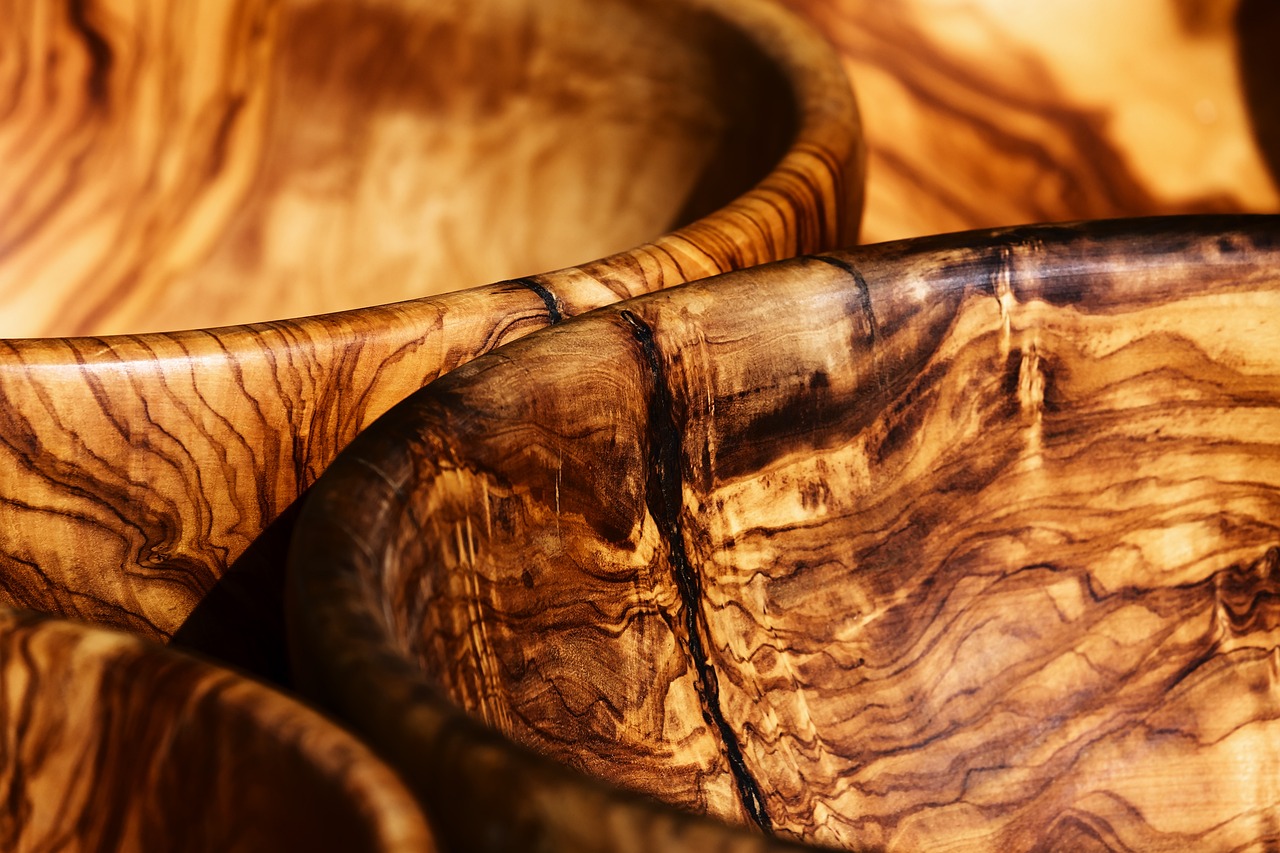
The grain patterns in olive wood also present their own set of obstacles. The grain can be interlocked or irregular, which can cause tear-out and splintering during the turning process.
It requires careful attention and skill to work with the grain and achieve smooth, clean cuts.
Another factor that adds to the complexity of turning olive wood is its natural oils. Olive wood contains oils that can clog tools and create a sticky residue.
This can affect the performance of cutting tools, leading to dulling or even damage if not properly managed.
These challenges, while daunting, do not mean that you should shy away from working with olive wood. With the right techniques, tools, and strategies, you can overcome these obstacles and successfully turn this beautiful wood into stunning creations.
In the next sections, we will explore the best practices for working with olive wood, including tips for handling its hardness, tackling grain patterns, and managing the natural oils. So let’s roll up our sleeves and dive into the world of turning olive wood!
The Hardness of Olive Wood
The hardness of olive wood is one of the primary reasons why it is considered a challenging wood to work with in the realm of turning. Olive wood is known for its density, which makes it much harder compared to many other common hardwoods.
The high hardness of olive wood can pose difficulties when it comes to shaping and carving. It requires sharper tools, as the wood can resist cutting and cause more strain on the tools if they are not properly maintained.
Dull tools will struggle to make clean cuts, resulting in rough surfaces and potential tear-out.
To successfully turn olive wood, it is important to use high-quality, sharp tools specifically designed for hardwoods. Keeping the tools sharp and well-maintained will not only make the turning process smoother but also help prevent accidents or mishaps caused by pushing too hard on the wood.
Additionally, it is essential to approach turning olive wood with patience and a steady hand. Due to its hardness, the wood may take longer to shape, requiring more deliberate and precise movements.
Taking your time and using gentle, controlled techniques will help you achieve better results and minimize the risk of damage to your project.
Understanding and acknowledging the hardness of olive wood is the first step towards successfully working with it. By using appropriate tools, keeping them sharp, and adopting a patient approach, you can overcome the challenges posed by the hardness of this unique wood and create beautiful turned pieces.
The Grain Patterns of Olive Wood
The grain patterns of olive wood are another factor that makes it a challenging wood to work with when it comes to turning. Olive wood is known for its unique and often intricate grain patterns, which can make the turning process more demanding.
The grain of olive wood can be interlocked or irregular, meaning that the fibers do not run uniformly in a single direction. This irregular grain can cause tear-out and splintering when cutting into the wood, especially if the tools are not properly positioned or the technique is not carefully executed.
To successfully work with the grain patterns of olive wood, it is important to pay close attention to the direction of the grain and adjust your cutting techniques accordingly. It is crucial to make careful cuts, going with the grain whenever possible, to minimize tear-out and achieve smoother surfaces.
Using sharp tools that are appropriate for working with hardwoods can also help in navigating the grain patterns of olive wood. Sharp blades will make cleaner cuts and reduce the likelihood of the wood fibers catching or tearing, resulting in a more polished finish.
It is worth noting that working with the grain patterns of olive wood requires practice and patience. Understanding the unique behaviors of the grain and experimenting with different cutting angles and techniques will help you develop the skills needed to work with this challenging wood.
By paying close attention to the grain patterns, using sharp tools, and practicing proper cutting techniques, you can overcome the challenges presented by the grain of olive wood and create stunning turned projects that showcase its distinctive beauty and character.
The Natural Oils in Olive Wood
The natural oils present in olive wood add another layer of challenge when it comes to turning this wood. Olive wood contains oils that can affect the performance of cutting tools and create a sticky residue, making it trickier to work with compared to woods without such oil content.
When turning olive wood, the natural oils can accumulate on the cutting tools, causing them to clog and lose their cutting ability. This can result in rough cuts, diminished control, and even potential damage to the wood or tools if not properly managed.
To combat the issue of natural oils, it is important to regularly clean and maintain your cutting tools during the turning process. Wiping the tools with a cloth or using a solvent appropriate for the wood’s finish can help remove any oil buildup and prevent it from affecting the quality of the cuts.
Another technique to deal with the natural oils is to use lubricants or cutting aids. Applying a small amount of lubricant, such as beeswax or a specialized turning lubricant, to the cutting edge of the tools can reduce friction and help prevent the oils from sticking to the blades.
Additionally, it is important to keep the work area clean, as any residue from the natural oils on the wood surface can transfer to the tools and affect their performance. Regularly wiping down the turning piece and workbench can help to minimize the oily buildup.
By being mindful of the natural oils in olive wood and taking proactive steps to manage them, such as regular cleaning and using lubricants, you can overcome the challenges they present and create smoother, cleaner cuts during the turning process.
Tools and Techniques for Turning Olive Wood
When it comes to turning olive wood, using the right tools and techniques is essential for achieving successful results. Let’s explore some tips and guidelines that can help you navigate the challenges presented by this unique wood.
1. Selecting the Right Tools: Due to the hardness of olive wood, it is important to use sharp tools that are specifically designed for turning hardwoods. High-speed steel (HSS) or carbide-tipped tools can provide the necessary durability and sharpness to handle the dense nature of olive wood. Make sure the tools are properly sharpened and maintained for optimal performance.
2. Cutting Techniques: When turning olive wood, it’s crucial to make deliberate, controlled cuts. Take your time and avoid rushing through the process. Start with light cuts and gradually increase the depth as you become more comfortable with the wood. Pay close attention to the grain patterns and work with the grain whenever possible to minimize tear-out and achieve smoother surfaces.
3. Proper Tool Rest Positioning: Positioning the tool rest correctly on the wood lathe is crucial for stability and control. Place the tool rest as close to the workpiece as possible without impeding the cutting action. This will provide support and reduce vibrations, allowing for more precise cuts.
4. Dust Collection and Airflow: Olive wood can produce fine dust during the turning process, which can be harmful to your health if inhaled. Always wear appropriate respiratory protection and ensure proper dust collection or ventilation in your workspace. This will help maintain a clean and safe turning environment.
5. Workpiece Stabilization: Olive wood can be prone to vibration and movement, especially if it has irregular grain patterns, so always secure the workpiece firmly in the lathe chuck or faceplate. This will improve stability, control, and the overall quality of your turning.
Don’t be discouraged by any initial challenges you encounter. With time and experience, you’ll develop the skills necessary to turn olive wood into stunning turned pieces.
Now that we’ve covered the tools and techniques, let’s move on to the final section of our journey: finishing olive wood projects.
Finishing Olive Wood Projects
Once you have successfully turned your olive wood project, it’s time to give it the finishing touches that will enhance its beauty and protect it for years to come. Here are some essential tips for finishing olive wood projects:
Start by sanding the turned piece with progressively finer grits of sandpaper. This will help remove any tool marks, smooth out the surface, and reveal the natural beauty of the wood grain. Take your time and ensure that you sand evenly across the entire surface.
Olive wood has natural oils that can affect the adhesion of finishes. To counter this, it is recommended to seal the wood before applying the final finish. Use a sanding sealer or apply a mixture of shellac and denatured alcohol to create a barrier that prevents the oils from interfering with the finish.
Selecting the appropriate finish is crucial in bringing out the inherent beauty of the olive wood. You have various options to choose from, including oils, waxes, lacquers, and polyurethane. Consider the desired look, level of protection, and ease of application when selecting a finish.
Follow the manufacturer’s instructions for the specific finish you have chosen. Apply thin, even coats using a brush, cloth, or spray. Allow each coat to dry completely before applying the next. Sand lightly between coats to ensure a smooth finish.
Once the final coat is applied and dry, you can buff and polish the surface to achieve a smooth, glossy sheen. Use a soft cloth or a buffing wheel to bring out the natural luster of the wood.
Proper maintenance will help preserve the beauty of your olive wood project. Avoid placing it in direct sunlight or areas with excessive heat or moisture. Regularly dust the piece and periodically apply a coat of wax or furniture polish to maintain its shine.
Now, it’s time to put these techniques into practice and start turning with olive wood!