The Biscuit Joint
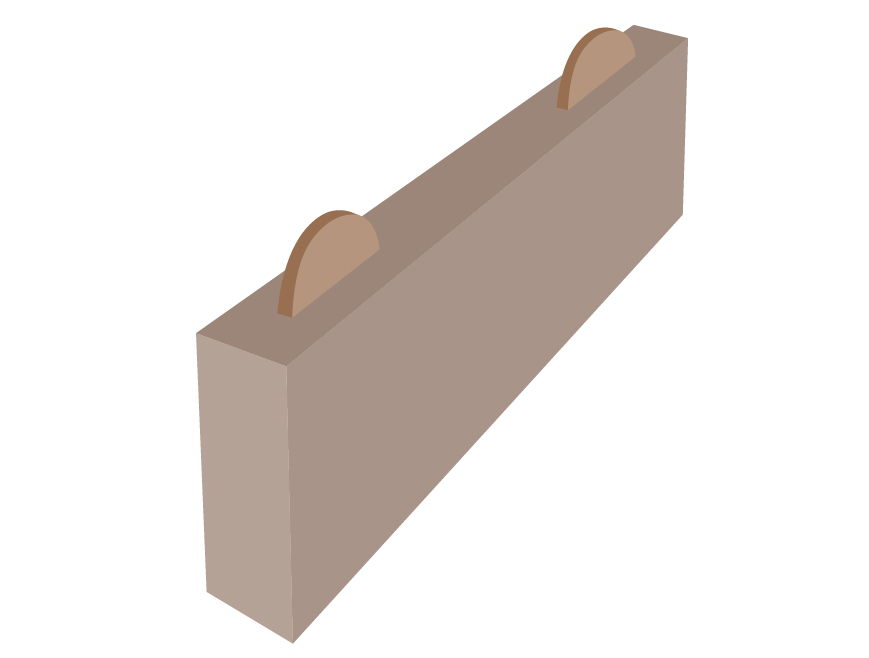
The biscuit joint is a woodworking technique used to join two pieces of wood together. It involves cutting a crescent-shaped hole, called a “mortise,” into the edge of one piece of wood, and then gluing a thin, oval-shaped piece of wood, called a “biscuit,” into the mortise. The two pieces are then clamped together until the glue dries, creating a strong, seamless joint.
The biscuit joint was invented in the late 1960s by a German woodworker named Dieter Schmid. He designed a specialized tool called a “plate joiner” (also known as a “biscuit joiner”) to cut the mortises and glue the biscuits in place. The tool quickly became popular among professional and amateur woodworkers because it made it easy to create strong, precise joints.
Where A Biscuit Joint Is Used
The biscuit joint is often used in situations where a strong and invisible joint is required. Some examples of when to use a biscuit joint include:
- For connecting shelves to a bookcase or cabinet, this is a common use for biscuit joints. By cutting a mortise into the side of the bookcase or cabinet and a corresponding groove into the edge of the shelf, a biscuit can be inserted and glued in place, creating a strong, seamless joint that holds the shelf securely in place.
- Biscuit joints can be used to attach a tabletop or countertop to a base, such as when building a table or a kitchen island. By cutting a mortise into the top edge of the base and a corresponding groove into the bottom of the tabletop or countertop, a biscuit can be inserted and glued in place, creating a strong and stable joint.
- When you need to join two pieces of wood at a right angle, for instance when building a corner cabinet, biscuit joints can be used to join the two sides of the cabinet together at a right angle. By cutting mortises into the edges of both pieces and corresponding grooves into the other piece, biscuits can be inserted and glued in place, creating a strong and stable joint.
- Biscuit joints can also be used to connect the horizontal rails and vertical stiles of a frame-and-panel door. This is done by cutting mortises into the edges of the rails and corresponding grooves into the stiles, biscuits can be inserted and glued in place, creating a strong and stable joint that holds the door frame together securely.
Biscuit joints are also an effective way to align pieces of wood that are slightly misaligned. The oval shape of the biscuit allows for some movement, making it easier to achieve a tight fit. They are also useful for adding strength and rigidity in situations where the wood is not thick enough to accommodate a traditional woodworking joint, such as a mortise-and-tenon joint.
Materials and Tools Required
- Wood glue
- Biscuit cutter or plate joiner
- Biscuits
- Clamps
- Saw
- Chisels (if cutting the groove by hand)
- Drill (if drilling the groove)
- Jigsaw (if cutting curves)
Step-by-Step Guide
Creating a biscuit joint is an exciting and satisfying process that allows you, to add a unique and elegant touch to your projects. Here’s a more detailed look at the steps involved in preparing the pieces for a biscuit joint.
Preparing the Pieces
- Measure and mark the location of the joint on the wood pieces. This is where the magic begins! By taking precise measurements and making accurate marks, you will ensure that your joint is perfectly aligned and positioned to create a seamless and beautiful finished product.
- Make sure that the two pieces of wood are flush and properly aligned. This is the critical step that guarantees your joint is going to be rock-solid! The alignment will allow the pieces to connect seamlessly and provide the strength your project needs.
- Cut the grooves for the biscuits using the biscuit cutter or plate joiner, or by hand using a saw and chisels, make sure that your chisels are sharp. This is where you get to show off your woodworking skills and precision. The grooves need to be parallel and of the correct depth to ensure a perfect fit for the biscuits. By making precise cuts, you’ll be able to create a joint that is seamless and beautiful.
- Sand the grooves smooth. The final touch before gluing the joint. By sanding the grooves you’ll be removing any rough edges, debris and make sure they are clean and even. This will make the biscuits fit perfectly into the grooves and increase the strength of the joint.
Once all these steps are completed, it is time to glue the joints and bring your project together.
Gluing the Biscuits
- Apply wood glue to the grooves and to the biscuits.
- Insert the biscuits into the grooves, making sure that they are evenly spaced and pressed down firmly.
- Use clamps to hold the pieces together while the glue dries. Place the clamps perpendicular to the joint and tighten them until you get an even clamping pressure.
Finishing
- Once the glue is dry, this can take up to 24 hours, then remove the clamps and clean up any excess glue.
- Sand the surface of the joint and finish as desired. Use a fine grit sandpaper and be careful not to sand away too much wood.
- Apply a finishing coat of your preference (stain, varnish, oil, etc)
It’s important to note that before gluing the biscuits, make sure to dry fit everything and make any necessary adjustments. If you are using a plate joiner, always read the instruction manual and be aware of the machine´s capacities, specially the thickness and width of the material you are working with. Biscuit joints can be tricky at times, but with a little practice and the right tools, you can create professional-looking, high-quality woodworking projects that will last for years.